Introduction: Enhancing Comfort and Functionality
Ceiling fans offer not only a refreshing breeze but also an aesthetic appeal to any room. If you’re looking to upgrade your space for better airflow and comfort, swapping a ceiling light for a fan is an excellent solution. In this guide, we’ll walk you through the step-by-step process of replacing a ceiling light fixture with a fan, allowing you to enjoy a cool breeze and improved air circulation in your home.
Assessing the Space: Choosing the Right Fan
Before diving into the installation process, take some time to assess the space where you plan to install the ceiling fan. Consider factors such as the room size, ceiling height, and existing wiring. Additionally, think about the style and functionality you desire in a fan, whether it’s a sleek modern design or a traditional look with integrated lighting. By determining these details upfront, you can select the perfect fan to complement your space.

Gathering Materials and Tools: Preparing for Installation
Once you’ve chosen the ideal ceiling fan, gather all the necessary materials and tools for the installation process. This typically includes the fan unit, downrod (if needed), mounting bracket, screws, wire nuts, electrical tape, wire stripper, and a ladder. Having everything on hand will streamline the installation and prevent any unnecessary delays.
Turning Off Power: Ensuring Safety First
Before beginning any electrical work, it’s crucial to turn off the power supply to the existing ceiling light fixture. Locate the circuit breaker or fuse box and switch off the corresponding breaker or remove the fuse. Use a voltage tester to confirm that the power is indeed off before proceeding with the installation. Safety should always be the top priority when working with electricity.
Removing the Existing Fixture: Preparing for Installation
With the power safely turned off, it’s time to remove the existing ceiling light fixture. Start by unscrewing and removing the light bulbs and any decorative elements. Next, use a screwdriver to detach the mounting screws holding the fixture in place. Carefully lower the fixture, exposing the electrical wiring and junction box in the ceiling. Take note of how the wires are connected, as you’ll need to replicate this when installing the new fan.
Installing the Ceiling Fan Bracket: Securing the Foundation
Begin the installation process by attaching the ceiling fan mounting bracket to the junction box in the ceiling. Follow the manufacturer’s instructions for your specific fan model, ensuring that the bracket is securely fastened and able to support the weight of the fan. Use a level to ensure that the bracket is installed perfectly straight, preventing any wobbling once the fan is in place.
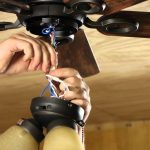
Wiring the Fan: Connecting Electrical Components
Next, it’s time to wire the ceiling fan, connecting the electrical components according to the manufacturer’s instructions. Typically, this involves connecting the fan’s wires to the corresponding wires in the ceiling junction box using wire nuts. Match the colors of the wires (black to black, white to white, and green or bare copper to the grounding wire) and secure them tightly with electrical tape for added safety.
Attaching the Fan Blades and Motor: Completing the Assembly
Once the wiring is complete, it’s time to attach the fan blades to the motor housing. Follow the manufacturer’s instructions for your specific fan model, ensuring that each blade is securely fastened and balanced for optimal performance. Once the blades are in place, carefully lift the fan motor and attach it to the mounting bracket on the ceiling, making sure all screws are tightened securely.
Testing and Final Adjustments: Ensuring Proper Operation
With the fan fully assembled and installed, it’s time to test its operation to ensure everything is functioning correctly. Turn the power back on at the circuit breaker or fuse box and flip the fan’s switch to the “on” position. Observe the fan as it operates, checking for any unusual noises or wobbling. If necessary, make any final adjustments to ensure smooth and quiet operation.
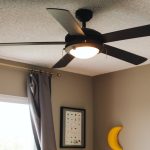
Adding Finishing Touches: Enhancing Aesthetics and Functionality
With the installation complete, take some time to add any finishing touches to enhance the aesthetics and functionality of your new ceiling fan. This may include installing light bulbs (if your fan has integrated lighting), adjusting the fan’s speed and direction, and adding decorative elements such as pull chains or a remote control. Step back and admire your handiwork, reveling in the newfound comfort and style of your upgraded space.
Conclusion: Enjoying the Benefits of a Ceiling Fan
Swapping a ceiling light for a fan is a rewarding DIY project that can significantly enhance the comfort and functionality of your home. By following the steps outlined in this guide, you can confidently tackle the installation process and enjoy the benefits of improved air circulation and energy efficiency. So go ahead, make the switch from light to breeze, and transform your space into a cool and inviting oasis.