Introduction:
Adding a ceiling fan to a room not only enhances comfort but also brings a touch of style and functionality to your space. If you’re looking to upgrade your ceiling lights fixture to a fan, you’ll be pleased to know that it’s a relatively straightforward process that can be completed with basic tools and a little know-how. In this guide, we’ll walk you through the steps to transform your space by changing your ceiling light to a fan, allowing you to enjoy improved air circulation and ambiance in just five simple steps.
Step 1: Preparation and Safety
Before you begin the installation process, it’s essential to prioritize safety and gather the necessary tools and materials. Ensure that the power to the ceiling light fixture is turned off at the circuit breaker to prevent electrical accidents. Additionally, gather tools such as a screwdriver, wire cutter/stripper, voltage tester, and a sturdy ladder. Confirm that you have the appropriate ceiling fan kit with all components included, including the fan motor, blades, mounting bracket, screws, and hardware.
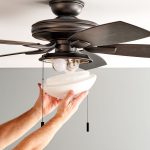
Step 2: Removal of Existing Light Fixture
Start by removing the existing ceiling lights fixture. Use a screwdriver to loosen and remove the screws holding the light fixture in place. Carefully detach the fixture from the ceiling, taking care not to damage the wiring. Once the fixture remove, use a voltage tester to ensure that the power is off before proceeding with any further steps. If the wiring is outdated or damaged, this may also be a good time to consider replacing it for safety and efficiency.
Step 3: Installation of Ceiling Fan Mounting Bracket
Next, install the ceiling fan mounting bracket provided with the fan kit. Follow the manufacturer’s instructions to secure the bracket to the ceiling junction box using the included screws and hardware. Ensure that the bracket is level and securely fastened to provide stable support for the ceiling fan. The mounting bracket serves as the anchor point for the fan motor and helps distribute the weight evenly across the ceiling.
Step 4: Wiring and Installation of Ceiling Fan
Carefully feed the electrical wires from the ceiling through the center of the ceiling fan mounting bracket. Connect the corresponding wires from the fan motor to the electrical wires in the ceiling, matching the black (hot), white (neutral), and green or bare copper (ground) wires. Use wire connectors to secure the connections, ensuring they are tight and properly insulated. Once the wiring is complete, attach the fan motor to the mounting bracket according to the manufacturer’s instructions, using the provided screws and hardware.
Step 5: Attachment of Fan Blades and Final Adjustments
Attach the fan blades to the motor assembly using the screws provided, following the recommended blade orientation for optimal airflow and balance. Once the blades securely attach, double-check all connections and fastenings to ensure they are tight and secure. Turn the power back on at the circuit breaker and test the fan operation using the pull chains or remote control, if included. Make any necessary adjustments to the fan settings or blade alignment to ensure smooth and quiet operation.
Conclusion:
By following these five simple steps, you can easily transform your space by changing your ceiling lights to a fan, enhancing comfort, style, and functionality in any room. With proper preparation, safety precautions, and attention to detail, you can complete the installation process efficiently and enjoy the benefits of improved air circulation and ambiance provided by your new ceiling fan. So roll up your sleeves, gather your tools, and get ready to elevate your space with this stylish and practical upgrade.